When I first moved to Portland, it was just me and my laptop and a few days until Comcast turned on the Internet. Luckily, some neighbors had open wireless access points, and I was able to get maps, check bus routes, and move up my appointment for high-speed internet. I wanted to extend the same courtesy to my neighbors and guests, so I configured my own open access point. If Bruce Schneier does it, why shouldn’t I?
A friend of mine strongly disagreed. His argument was simple – I’m not Bruce Schneier, and neither is anyone in my family. Good point. He convinced me to put our computers on a encrypted channel, but I still wanted to provide easy access for guests and neighbors. Luckily, there are some open source projects that make this possible.
I have a Linksys WRT54GL wireless router, which I bought for the express purpose of installing an open-source firmware and accessing the additional features of the Broadcom BCM5352 chip that drives it. A friend suggested the X-Wrt project, which adds administration web pages to the OpenWRT firmware. The installation wasn’t too difficult, once I figured out which image to use, and the web interface made the configuration painless. It was easy to setup a WPA2-protected network, which worked great for our laptops and the Wii (the X-Box and TiVo don’t support WPA2).
Once I had a working encrypted wireless network, I started configuring the guest wireless network, and it was really tricky. Tricky, but possible. Isn’t that the way it is with Linux? I’ve documented all the painful details, including 19 screenshots, after the jump.
Will it work with my router?
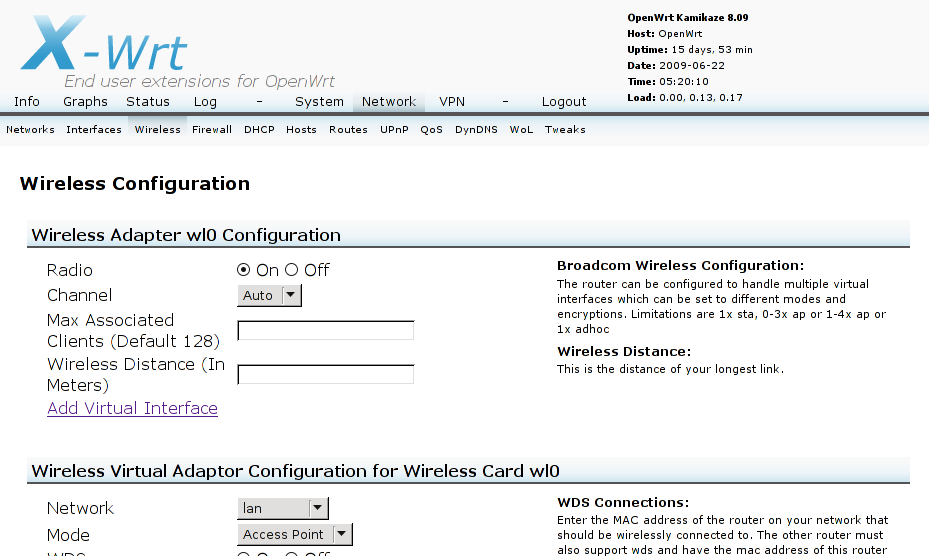
On the Network tab, Wireless subtab, look for this text:
Broadcom Wireless Configuration:
The router can be configured to handle multiple virtual interfaces which can be set to different modes and encryptions. Limitations are 1x sta, 0-3x ap or 1-4x ap or 1x adhoc

We’re setting up an Access Point (“ap”), with different encryption. “sta” must refer to Wireless Distribution System (WDS), where a wireless network can be expanded without a wired backbone, and “adhoc” is an ad hoc wireless network. As you can see, the Broadcom chip is very flexible, and the OpenWRT firmware exposes that flexibility. If your chip doesn’t allow multiple access points, then don’t bother.
The Proceedure
To add a open wireless network in X-Wrt, you need to go to the Network tab, and then on each sub-tab:
- Networks – Add the network
- Interfaces – Associate it with a new VLAN
- Wireless – Associate it with a new Wireless Virtual Adaptor
- Firewall – Allow it to talk to the Internet
- DHCP – Enable DHCP on the network
However, there are some gotchas.
The X-Wrt interface (Webif2) remembers the changes you requested in the order requested, and then allows you to apply the changes or cancel them. Sometimes you need to click ‘Save Changes’ to remember your request, and sometimes another button works. There’s no ‘undo’ button, just the option to cancel all the unapplied changes. So, go slowly, and complete all the actions on the sub-tab. If you mess up, select ‘Clear Changes’ and start that step over.
The configuration scripts got stuck in a few places for me. I had to SSH into the router, use ‘ps’ to determine the process number, and ‘kill’ to stop the process. For the firewall configuration, I had to manually edit a file using ‘vi’. If you aren’t comfortable doing this, find a Linux friend who is.
Networks – Add the network
Log into the web interface, go to the Network Tab, and then the Networks subtab. It looks like this:
Scroll to the bottom, and there is an Add Network input box. Pick the name of your network – I used ‘guest’, and click ‘Add Network’.

The page will refresh. Scroll down again, and there is the guest network. However, nothing has changed yet – note the “Review Changes (2)”. Make a few more before applying these.
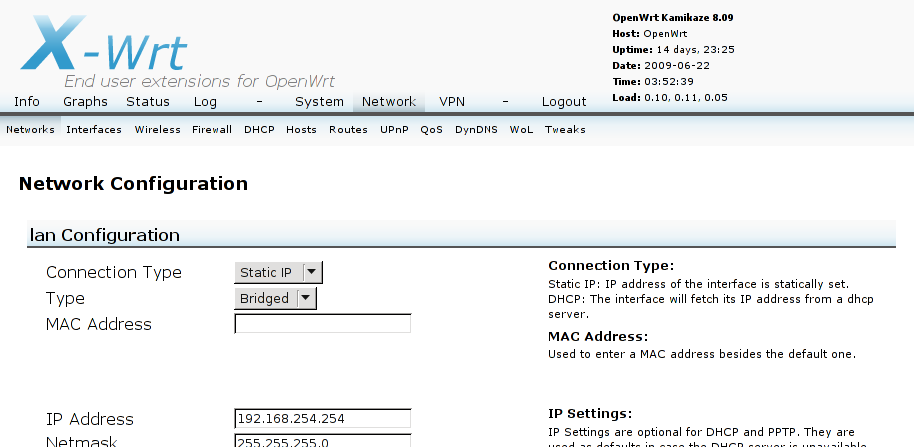
Change the Connection Type for the guest Configuration to “Static IP”, and the Type to ‘Bridged’. Give it an IP address like ‘192.168.2.1’, distinct from the ‘lan’ network. You’ll need a netmask too (‘255.255.255.0’). You can leave the rest blank for reasonable defaults. Now click the ‘Save Changes’ button.

The page will refresh again. Scroll all the way down, and it should say ‘Review Changes (11)’. Click on ‘Review Changes’, and see what will be done.
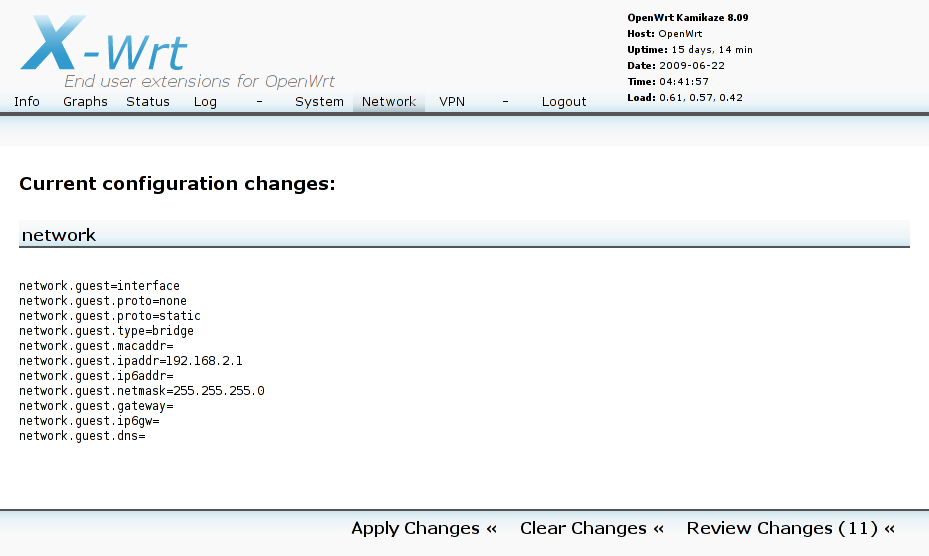
If your changes don’t resemble this, you may want to click ‘Clear Changes’ and start over. Otherwise, click ‘Apply Changes’. As commands are executed, they will appear on screen:

Your commands might not resemble mine. For example, the bit about “1.openwrt.pool.ntp.org: Unknown host” is because I use NTP, which you may not have enabled.
If it worked correctly, then you’d be back at the Networks sub-tab. But, if you have my problem, then you are stuck on this page, and it doesn’t go any farther. There are two solutions. You can just restart the router, by removing power or using the reset button, log back in, and go onto the next section. Or, if you are comfortable with SSH, you can force the config to end without restarting.
Log into to the router, and type ‘ps’. You should get something like this:
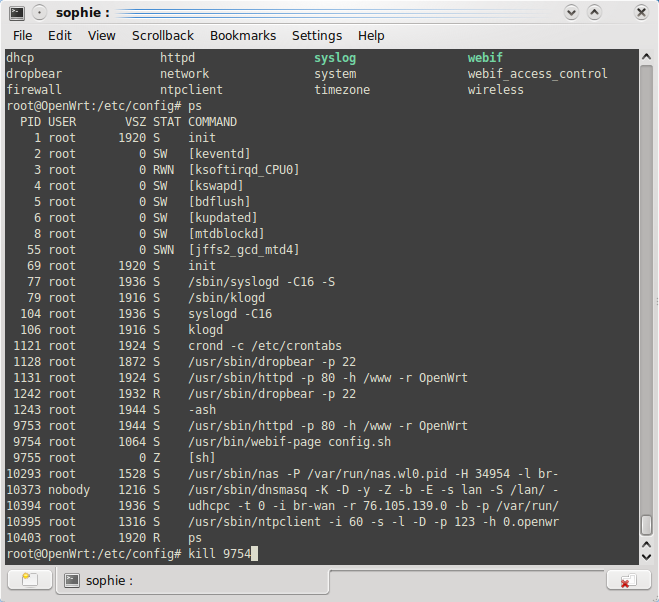
The culprit is process 9754, the command “/usr/bin/webif-page config.sh” (your process number will be different). Something is stuck, and I don’t know what. The fix is to run ‘kill 9754’, which will stop that process and allow the configuration to proceed. In a few seconds, the Networks sub-tab will reload, and the changes are committed.
At this point, you have a ‘guest’ network setup, but it doesn’t do anything at all. If you want to peek behind the scenes, SSH to the router and look at /etc/config/network. There is a ‘guest’ interface, but it has no ‘ifname’ option. That’s the next step.
Interfaces – Associate it with a new VLAN
Next, go to the ‘Interfaces’ subtab of the Network tab. This is where you configure the Virtual LANs, or VLANs.
First, click ‘Add New VLAN’. The page will refresh (with 1 change to apply). Next, assign the new VLAN to the ‘guest’ network, and select Save Changes. This should bring the changes up to 3.

In my case, the new VLAN is VLAN 2. By default, it was assigned to port 5. My guess is that ports 0 through 3 are the wired ports (labeled 1-4 on the back, and probably the labeled port 4 is port 0 on this page), 4 is the Internet port, and 5 is the wireless port. So, the default is correct – I want my new VLAN to be assigned to just port 5.
Here are the changes to apply:

When I applied these changes, it froze on ‘Updating your configuration’ again. Either cycle power, or log in and kill the “/usr/bin/webif-page config.sh” process as shown before. How sad.
At this point, you have a ‘guest’ network setup and assigned to a VLAN, but it still doesn’t do much of anything. If you look at /etc/config/network, there is a new vlan, and the the ‘ifname’ option for the ‘guest’ interface is set. You can run ‘ifconfig’ and see the new interface.
Wireless – Associate it with a new Wireless Virtual Adaptor
Next, go to the ‘Wireless’ subtab of the Network tab. Add a new Virtual Interface by clicking the “Add Virtual Interface” link , under the ‘Wireless Adapter wl0 Configuration’ heading. The page will refresh, you’ll have a new ‘Wireless Virtual Adaptor Configuration for Wireless Card wl0’ section, and 6 changes to apply.
For the new virtual adaptor, set the network to ‘guest’, and set a ESSID. This is what people will see when they go to connect to your network. I suggest you don’t use underscores, since X-Wrt uses them to seperate values, and you use something distinct from ‘guest’ so you can find it in config files. I used ‘guest’ plus the number from my address.

Click Save Changes, and you are up to 31 changes., most empty.
Apply those changes. For me, it froze once again. Cycle power, or log in and kill the config process.
At this point, you are now exposing the ‘guest’ network. If you look on a laptop, you can see the SSID you set up, and even join the network. However, you won’t get a good IP address, and you won’t be able to get on the Internet. If you look at /etc/config/wireless, your new wifi-iface is there. If you run ‘ifconfig’, there is a new wireless lan, ‘wl0.1’, and ‘iwconfig’ will give you some more information.
Firewall – Allow it to talk to the Internet
Here’s where you need to manually edit a file. SSH to the router, and edit /etc/config/firewall. You need to add a zone for ‘guest’ that looks like ‘lan’:
config 'zone'

option 'name' 'guest'

option 'input' 'ACCEPT'

option 'output' 'ACCEPT'

option 'forward' 'REJECT'
Now, go to the ‘Firewall’ sub-tab of the Network tab. We’ll need to allow traffic from the ‘guest’ network to the ‘wan’ (Wide Area Network, in this case the Internet), and vice-versa.
Here’s what I started with:
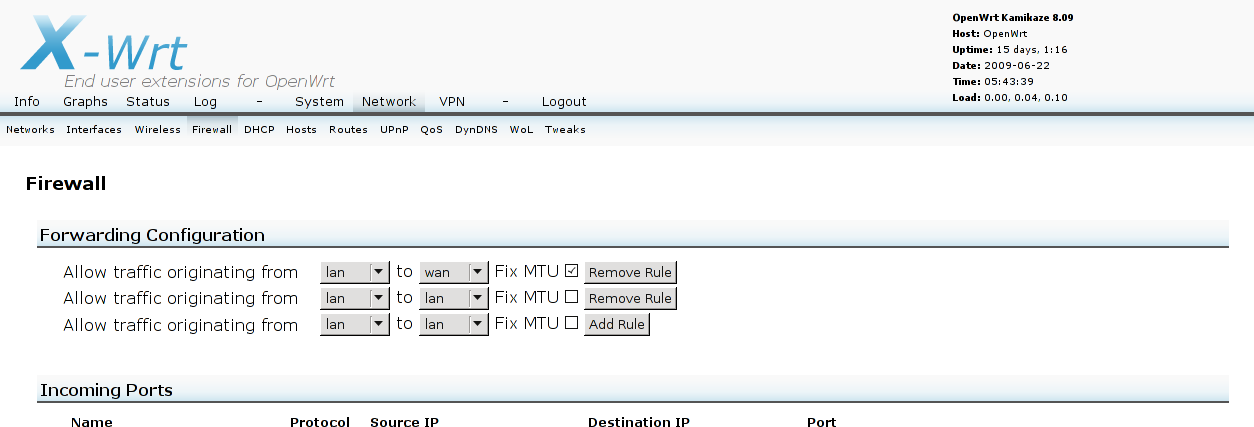
That bottom line reads “Allow traffic originating from <lan> to <lan>”. Change it to “Allow traffic originating from <guest> to <wan>”, select “Fix MTU”, and click “Add Rule”. The page will refresh, and your new rule will now have a “Remove Rule” button. There are 4 changes to review.
Next, change the bottom line to “Allow traffic originating from <wan> to <guest>”. Leave “Fix MTU” unchecked, and click “Add Rule”. The page will refresh. In case you were wondering, there is an implicit “Allow traffic originating from <wan> to <lan>” rule, but we need it to be explicit for our new network, or our users won’t get any pages from the Internet. There are now 8 changes to review.
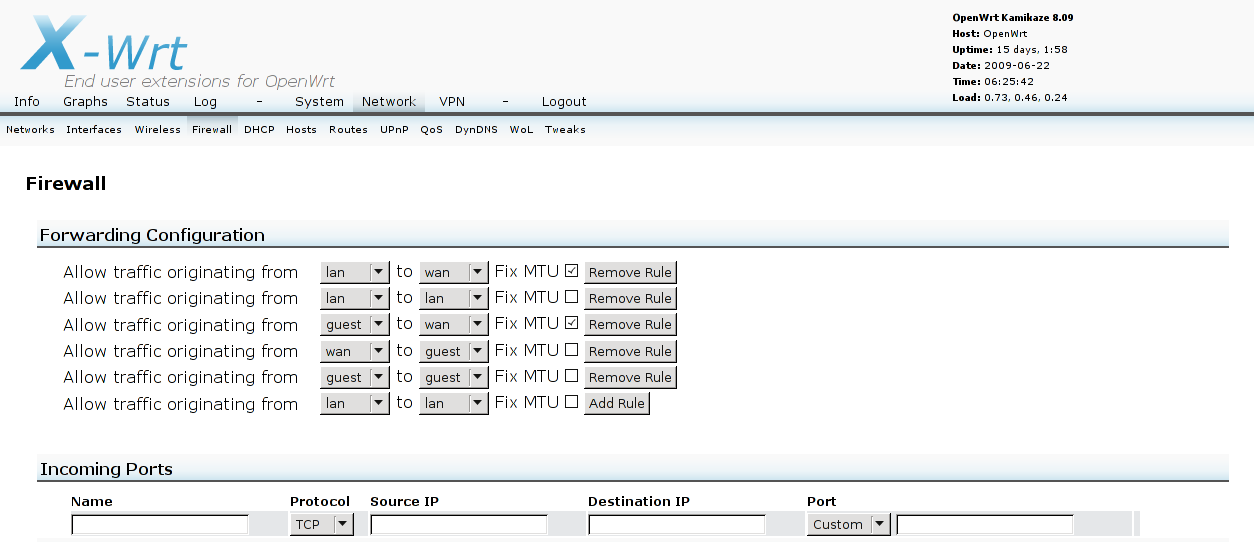
Next, change the bottom line to “Allow traffic originating from <guest> to <guest>”. Leave “Fix MTU” unchecked, and click “Add Rule”. This will allow computers on the guest network to talk to each other, and is required for DHCP to work. The page will refresh, and there will be 12 changes to review.
Here’s what it looks like now:
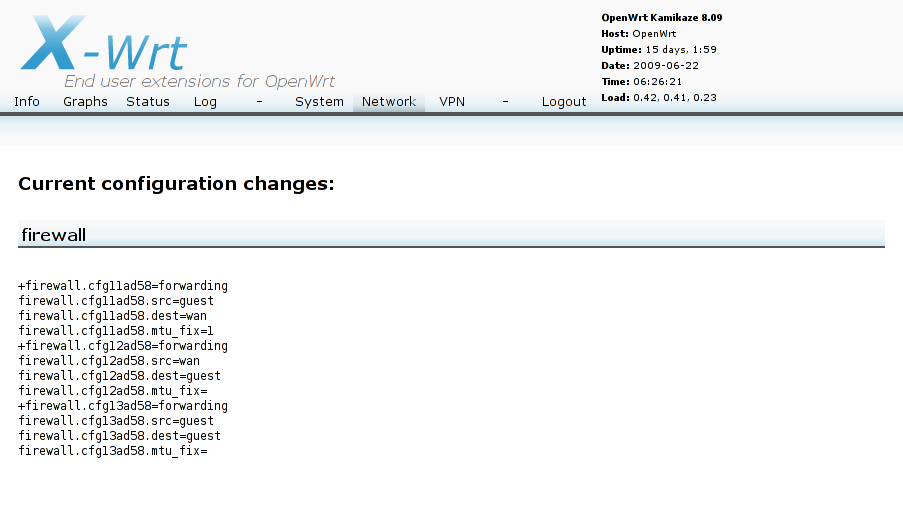
Here are the changes to review:
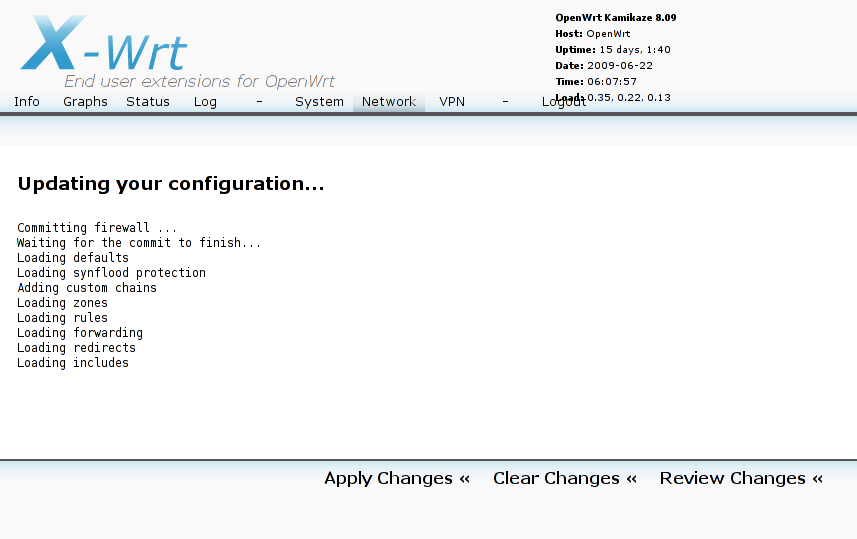
Apply those changes. This time, the configuration went through without hanging. It looked like this:
If you don’t manually edit /etc/config/firewall first, you get some errors, such as “iptables: No chain/target/match by that name” and “iptables v1.3.8: Couldn’t load target ‘zone_guest_ACCEPT’ :File not found”:

At this point, a person can connect to the guest network, manually set their IP address and other settings, and get on the Internet. However, we still need DHCP for it to be truly useful. If you look at /etc/config/firewall, you can see the new forwarding rules, and you can run ‘iptables –list’ for the gory details.
DHCP – Enable DHCP on the network
For the final configuration, go to the DHCP sub-tab of the Network tab. Scroll down, and click “Add DHCP” for the guest network. The page will reload, with 6 changes to commit.

Now, enable DHCP for the guest network, and enter values for Start, Limit, and Lease Time. I copied the values from ‘lan’ of 100, 150, and 720.

Click ‘Save Changes’, and there will be 10 changes to commit.

Apply the changes. For me, the configuration went smoothly, with no reboot required.
At this point, a person can connect to the guest network and get on the Internet. You’re done!
Further Work
If you want a wired computer to be available on the guest network, you can add an ethernet port to the guest VLAN.
It would be nice if guest computers couldn’t talk to other guest computers (think of a coffee shop). However, all of the computers need to talk to the router to use DHCP. There should be a way to only allow guest computers to talk to the DHCP port on the router, but you may need to work directly with iptables.
I hope this helped, and I hope the X-Wrt folks can figure out why some steps are harder than they need to be.
